Digital marketing is a data-driven environment in which customer insights are essential for using Google Tag Manager effectively. Therefore, the importance of effective tagging is a matter of great significance. Every user action, such as a click, a scroll, or a conversion, can bring out insightful data not only to help marketers improve their strategies but also to enhance the user experience. Nevertheless, in the middle of a huge and complicated digital world, the problem of tracking and managing these user interactions using Google Tag Manager can get serious. At this point, Google Tag Manager (GTM) refers to the solution for the problem of tagging in a simplified and efficient manner.
Properly installed GTM and a connection with such services as Google Analytics, GA4, Google Ads, and other web analytics platforms will make it possible for you to get insights without any difficulty or delay. This article will delve into GTM and figure out a simple way to set it up so that it is not only under control but also efficient. So, let’s dive right in!
What is Google Tag Manager?
Google Tag Manager is a tool available at no cost from Google, which allows the straightforward addition and handling of marketing and analytics tags on your site. This can be done without the necessity of coding or changing the code by yourself. These tags collect and send data to the third-party services (e.g., Google Analytics and Facebook Pixel) that help you track and monitor user interactions on your website, such as the pages that users visit, the items that they click on, and the way that they come to your site.
When you properly implement Google Tag Manager code and use the GTM container code, GTM acts as a container code snippet that holds all your tracking code setups in a single spot. Moreover, it enables you to verify if every tag is supposed to execute through triggers to carry out the action at the correct time.
Advantages of Using Templates in GTM
There are several smart advantages of using templates in Google Tag Manager (GTM), and among these advantages are the following:
- Efficiency: Templates hasten the tagging process. Instead of constantly making new tags from scratch, you can simply use the existing templates. The less time you spend handling codes, the more time you get to do other marketing jobs. Besides, templates simplify the tag configuration process and help users select the right Google tag type or the correct Google tag.
- Consistency: Templates guarantee that the tags you have set up are done uniformly throughout your site. This is the key to the correct data gathering and reporting. The usage of GTM templates, especially when deploying Google Analytics tracking, global site tag versions, or GA scripts, makes consistency work effortlessly.
- Error Reduction: GTM templates can be seen as protective equipment in the management system of your Google Tag Manager installation. They try to avoid the most frequent errors in the process of setting up the tags. This implies fewer error-causing instances, which means a safer website for you.
Setting Up Your Google Tag Manager Account
Creating an account with Google Tag Manager is the first step in using GTM to manage the tags of your website. If you are installing the GTM code on your website by yourself or you want a developer to do it for you, the steps are equally straightforward. Setting up an account involves making your way through the process in the following manner:
Step 1: Register
Head to the Google Tag Manager website and get a new account by signing up with your Google info. Just be aware that the primary Google account you use to log in will be the one to create a GTM account and install GTM later.
Step 2: Account Creation
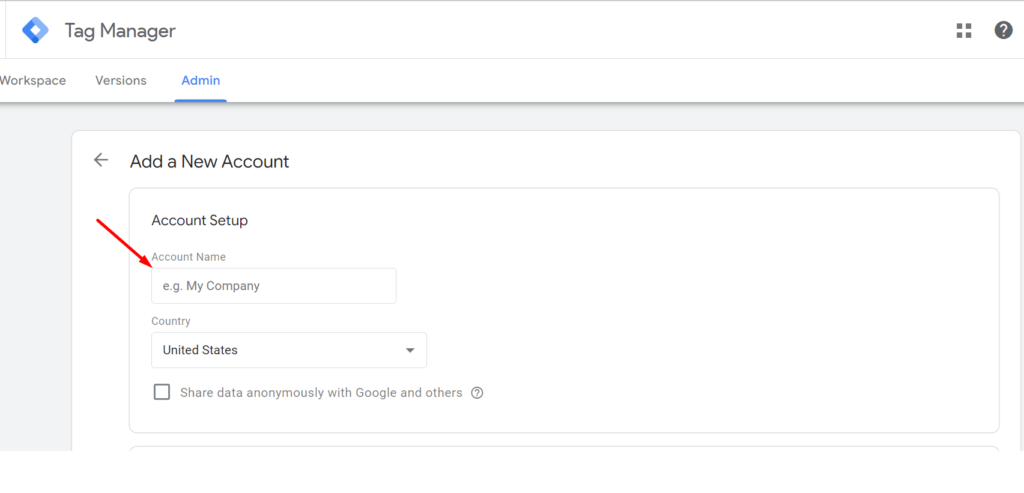
After logging in, click the button for ‘Create Account.’ Enter an account name and drop a pin for your business in the “Country” field. Don’t forget that if you plan to manage multiple websites from one Google Tag Manager account, you should first create a strategy for them.
Step 3: Container Setup
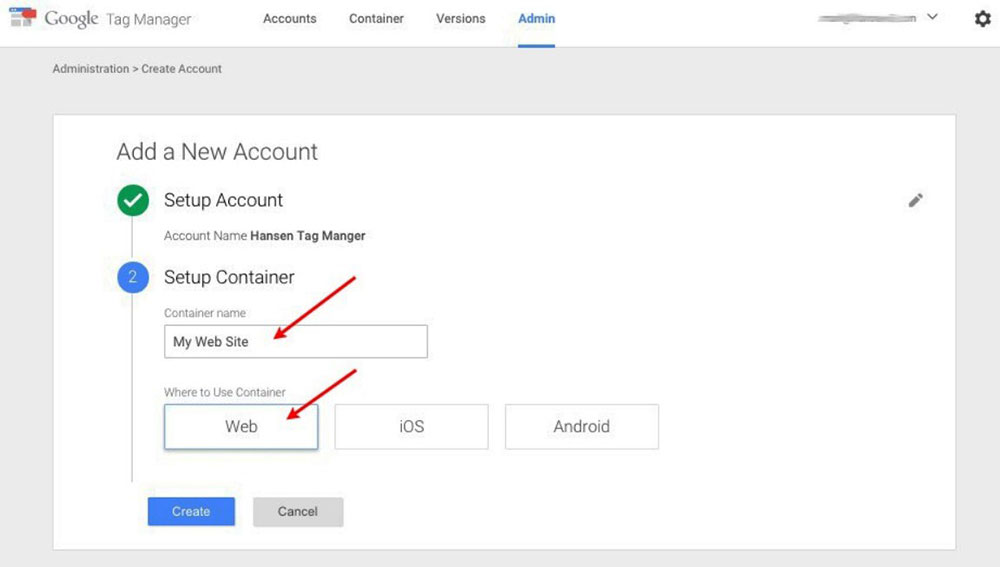
Choose a name for your tag container, which is the file or the location where the tags are stored. The user can define the goal platform for which the tags are being set (web or app). Your GTM container creates a unique GTM code snippet for the installation, along with the directions for the installation part and where the first code should be located in the header of your website.
Step 4: Installation of Container Snippet
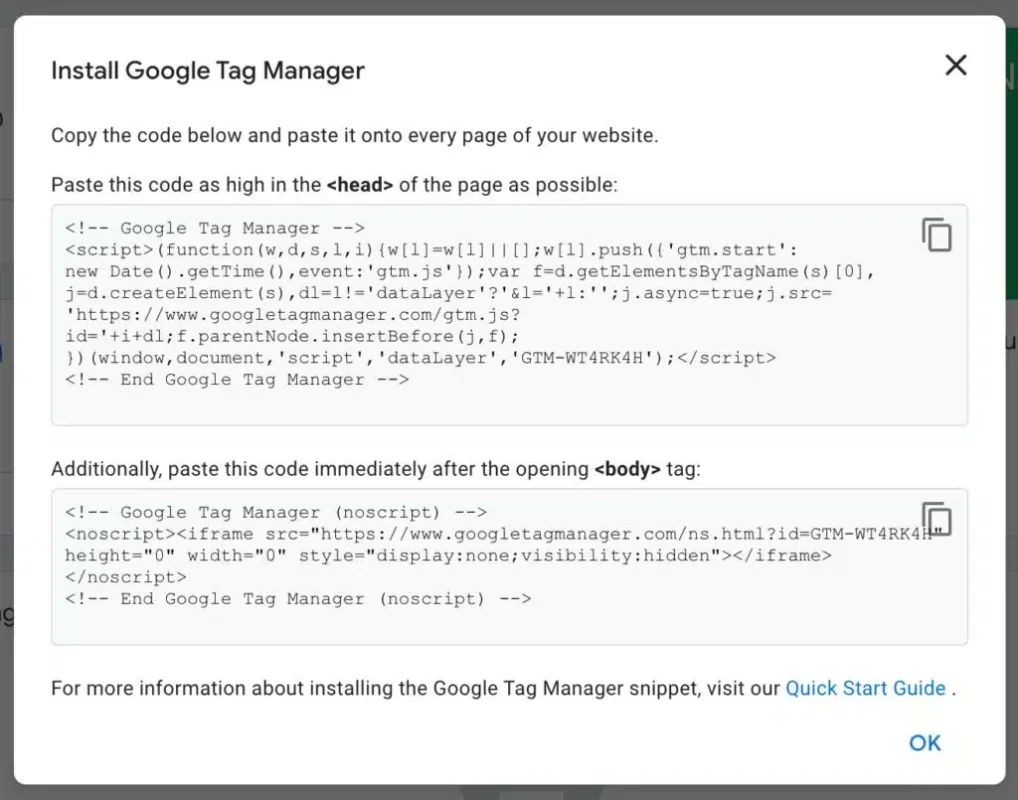
The GTM system offers a snippet of the container. Part the container code into the website’s header and body, with each page containing the pasted snippet. Having accomplished the move, Google Tag Manager is implemented successfully, and users are allowed to proceed with advanced tracking practice through Google Tag Manager. In case you are using WordPress, you can place the code snippet via the theme editor or plugins. It is through this process that GTM gets to be on all the pages, including any iframe loads.
When you manage to put your account in place, the next important thing would be to arrange your working area in a way that will facilitate the management of tags. Here are some suggestions for your efficient management:
- Uniform Naming: Assign functions to tags, triggers, and variables with descriptive names for effortlessly recognizing what they perform. When you come back to your GTM later and want to find the tag type details or tag configuration section entries, this will also greatly help you.
- Folders: Collect the similar tags and folders-use the triggers you have created for them in order to easily navigate and manage them. The more you work with multiple website analytics tools, custom HTML tag setups, JavaScript code triggers, or source code references, the more this will become indispensable to you.
- Using Version: Utilize Google Tag Manager’s capability to save versions of changes to have a record of work done and to be able to rollback if needed. Always remember, before you publish a container, do the final check of everything in GTM preview mode and debug tools to be sure that all tags in GTM are fired correctly.
Best Practices for Maintaining and Optimizing Your Tag Manager Setup
It is equally important to keep and improve your Google Tag Manager installation if you want continuous success. The best thing to do is to follow these best practices to have a GTM that is not only effective but also efficient in the long run:
- Regular Auditing: Keep up with the audit practice for your tags in Google Tag Manager, triggers, and variables. Do an inspection for any tags that are not only obsolete but also those that have been unnecessarily duplicated.
- Use Naming Conventions: One of the first steps to an efficient working environment is the implementation of naming conventions in your Google Tag Manager container. These should be logical and straightforward for your tags, triggers, and variable names. This way, the team will not only be able to work faster but also understand how the setup is functioning.
- Document Changes: Never rely just on your memory about the things you have done in GTM. Be sure also that you have updated your GTM by putting descriptions when you are creating new versions, and installed an external log for your records if you want.
- Monitor Performance: Make it a habit to monitor your tags’ performance regularly and diligently. In addition to this, you may also use page source and Chrome extension tools, and the tag assistant to cross-check and ensure accuracy.
- Test Before Publishing: None other than the Preview and Debug mode should be utilized when testing your changes before publishing to verify that everything is in proper working order. Testing is the main ground where you can find faults that hinder your site and have them resolved on time before your site goes live.
- Stay Updated: Always be current with what GTM has to offer and be ready for any changes coming up. Being up-to-date will help you to use all the features of GTM to the fullest extent.
Implementing these best practices helps to ensure a well-structured and productive GTM environment. It is through regular inspections and good management habits that your marketing activities will not only maintain their level of accuracy but also their efficiency.
Conclusion
Armed with the knowledge and tools, this would be an excellent moment to get acquainted with the world of Google Tag Manager templates. You should not allow the intricacies of tracking and tagging to intimidate you. GTM templates enable you to accomplish the task at hand in a more efficient manner, therefore making it nearly impossible to commit errors when using Google Tag Manager correctly. In case you are operating with GTM, putting GTM container code, or handling various snippets and tracking tags, it usually becomes much more convenient compared to working directly with source code.
GTM templates may be a great help to you if you are a small business owner, a digital marketer, or a website administrator, and they can also help you make better-informed decisions from accurate data. So, go ahead, discover what you can do, and enjoy the benefits of streamlined tagging with the GTM template!

Vijay Sood is a seasoned digital marketer with a passion for driving online growth and innovation. With a robust background in developing and executing comprehensive digital strategies, Vijay excels in leveraging SEO, content marketing, and social media to boost brand visibility and engagement. His expertise lies in transforming data-driven insights into actionable marketing campaigns, helping businesses achieve their digital objectives.